Openers · Nelson Park
Photo-Eye Sensor Alignment or Replacement in Nelson Park
There are no sensors at the floor at all, or a previous owner has wired the pair together up beside the motor so the beam never crosses the doorway. A home inspector has just pointed it out.
Photo-Eye Sensor Alignment or Replacement
In plain words
By the end of the visit you have a door that closes from every control and reverses the instant the beam is broken, a sensor pair mounted level at the right height with steady indicator lights, wiring that is secured and out of harm's way, and a written note of what was found and what was changed. The technician walks you through the two tests you can repeat monthly, points out which light is which, and leaves the opener's diagnostic chart where you can find it. It is a small job that puts a large piece of your door's protection back in service.
How the visit goesAfter a cold night the door stays open until the garage warms up. There is frost on the sensor lenses and a ridge of salty slush piled against the brackets where the snow blower was parked.
Nelson Park
How the visit goes
Brackets and height on both sides
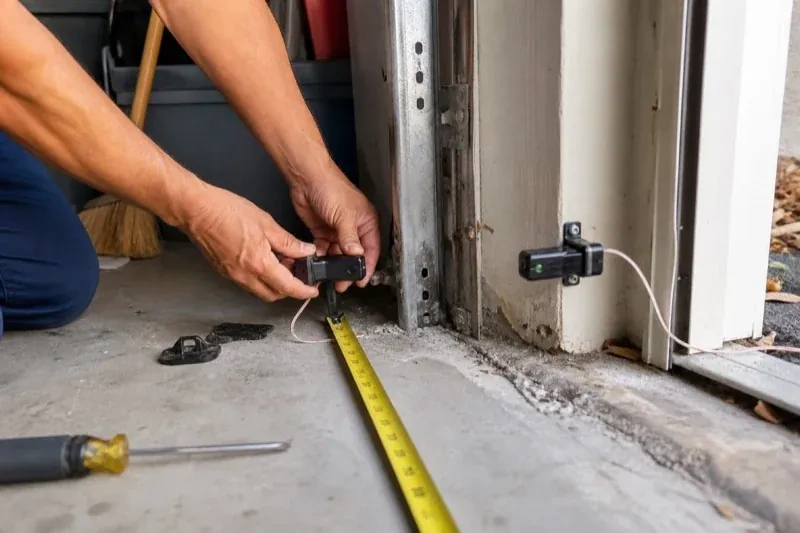
The two sensors have to sit at the same height, level, and facing each other squarely, no higher than about 15 cm (6 in) above the floor so the beam catches a small child or a pet. The technician measures both sides, because a bracket that has slipped a couple of centimetres down a track leg is enough to lose the beam. Each bracket is checked for bends from a bumper or a bin, for loose carriage bolts or wing nuts, and for rust where salt slush has sat against it for winters on end. A bracket screwed to a wall or the floor is checked for anchors that have worked loose.
Cleaning and protecting the lenses
Lenses are wiped with a soft cloth and a mild cleaner, never scraped, and the housings are checked for cracks that let in water. Sensors that have been sitting in the strip where slush and salt collect are raised within the permitted height range and their brackets sealed. On a wall where the wire runs exposed, a slim protective channel keeps it clear of bins and bikes. Where mice have been at the wire, the new run is routed higher along the wall and dropped straight down to each sensor. These small measures are what keep a repair from repeating the following winter.
A record of the work
You have a short written note of what was done: the opener make and model, what the diagnostic code and the sensor lights showed on arrival, whether the fault was alignment, wiring, sun or a worn sensor, what was replaced and where the new parts sit. It records the height the sensors were set at and that both tests were passed with you watching. That note is useful for a home inspection, for the next technician, and for you, because it shows what normal looks like on this door so a future change is easy to describe over the phone.
Photo-Eye Sensor Alignment or Replacement
In the van
- Wire connectors
- Multimeter
- Matched photo-eye sensor pair
- 2x4 test block
- Protective wire channel
What affects the quote
Same fees day, night or weekend
1Wall or floor mounting with anchors
Mounting into concrete or masonry rather than onto the track means drilling, anchors and sealing against water, which takes more time than clipping to the rail.
2Number of doors
Each opener has its own sensor pair and wire run, so a double garage with two doors is two sets of checks, two possible pairs and two rounds of testing, quoted per door.
3Undoing an earlier shortcut
Sensors taped together beside the motor, mismatched pairs from different generations or a bypassed circuit are put right first, which means new wire down each side and fresh brackets at the doorway.
Photo-Eye Sensor Alignment or Replacement: questions
How high off the floor should the sensors sit?
Low. The industry checklist expects the beam no more than roughly 15 cm (6 in) up from the floor, so that a small child, a pet or a bicycle wheel breaks it. Both sensors are set at the same measured height and level with each other, since a difference of a couple of centimetres is enough to lose the beam. Within that rule the technician can raise them a little to keep them out of the strip where slush collects.
Do I need to be home for the work?
It helps. The technician needs access to the garage and the head unit, and the visit ends with a demonstration of the sensor lights and the two tests so you know what normal looks like. If you cannot be there, an adult who can open the garage is enough, and the written note left afterwards records what was found and changed. Having the strip of floor beside the door clear before arrival saves time either way.
The opener light blinks when I press close. Is that the sensors?
Very often, yes. A blinking bulb after a close command is the opener reporting that its sensor circuit is unhappy, and the count of blinks is the message: one common family uses ten flashes for the sensors, while a short two-flash pattern usually means the wall control's lock button is on. Newer units add arrow codes that separate a blocked beam from a cut or reversed wire. Counting the flashes and telling the technician the make helps identify the cause before the visit.
Openers & Access
- Chain-Drive Opener RepairThe chain hangs in a loop under the rail and slaps against it on every cycle.
- Belt-Drive Opener RepairPress the remote and the motor runs its full cycle, lights on, the usual whir, but the door does…
- Garage Door Opener ReplacementYou swapped the old wooden door for a heavier insulated steel one, and the twenty-year-old opener…
Photo-Eye Sensor Alignment or Replacement near you
Our garage door services for Nelson Park are written up one by one so you can read exactly what happens during the visit. Spring and cable replacement, off-track repair, opener diagnosis, remote programming, weatherstripping, tune-ups, panel replacement and full door installation are all described in plain words.